Converting PNG to ICO format has become an essential skill for web developers, designers, and Windows users who want to customize their digital experience. Whether you’re creating website favicons, desktop icons, or application shortcut icons, understanding the PNG to ICO conversion process efficiently is crucial. This comprehensive guide will walk you through everything you need to know about converting files from PNG to ICO format, from understanding the basic formats to mastering the best tools available today.
Understanding PNG to ICO: The Basics
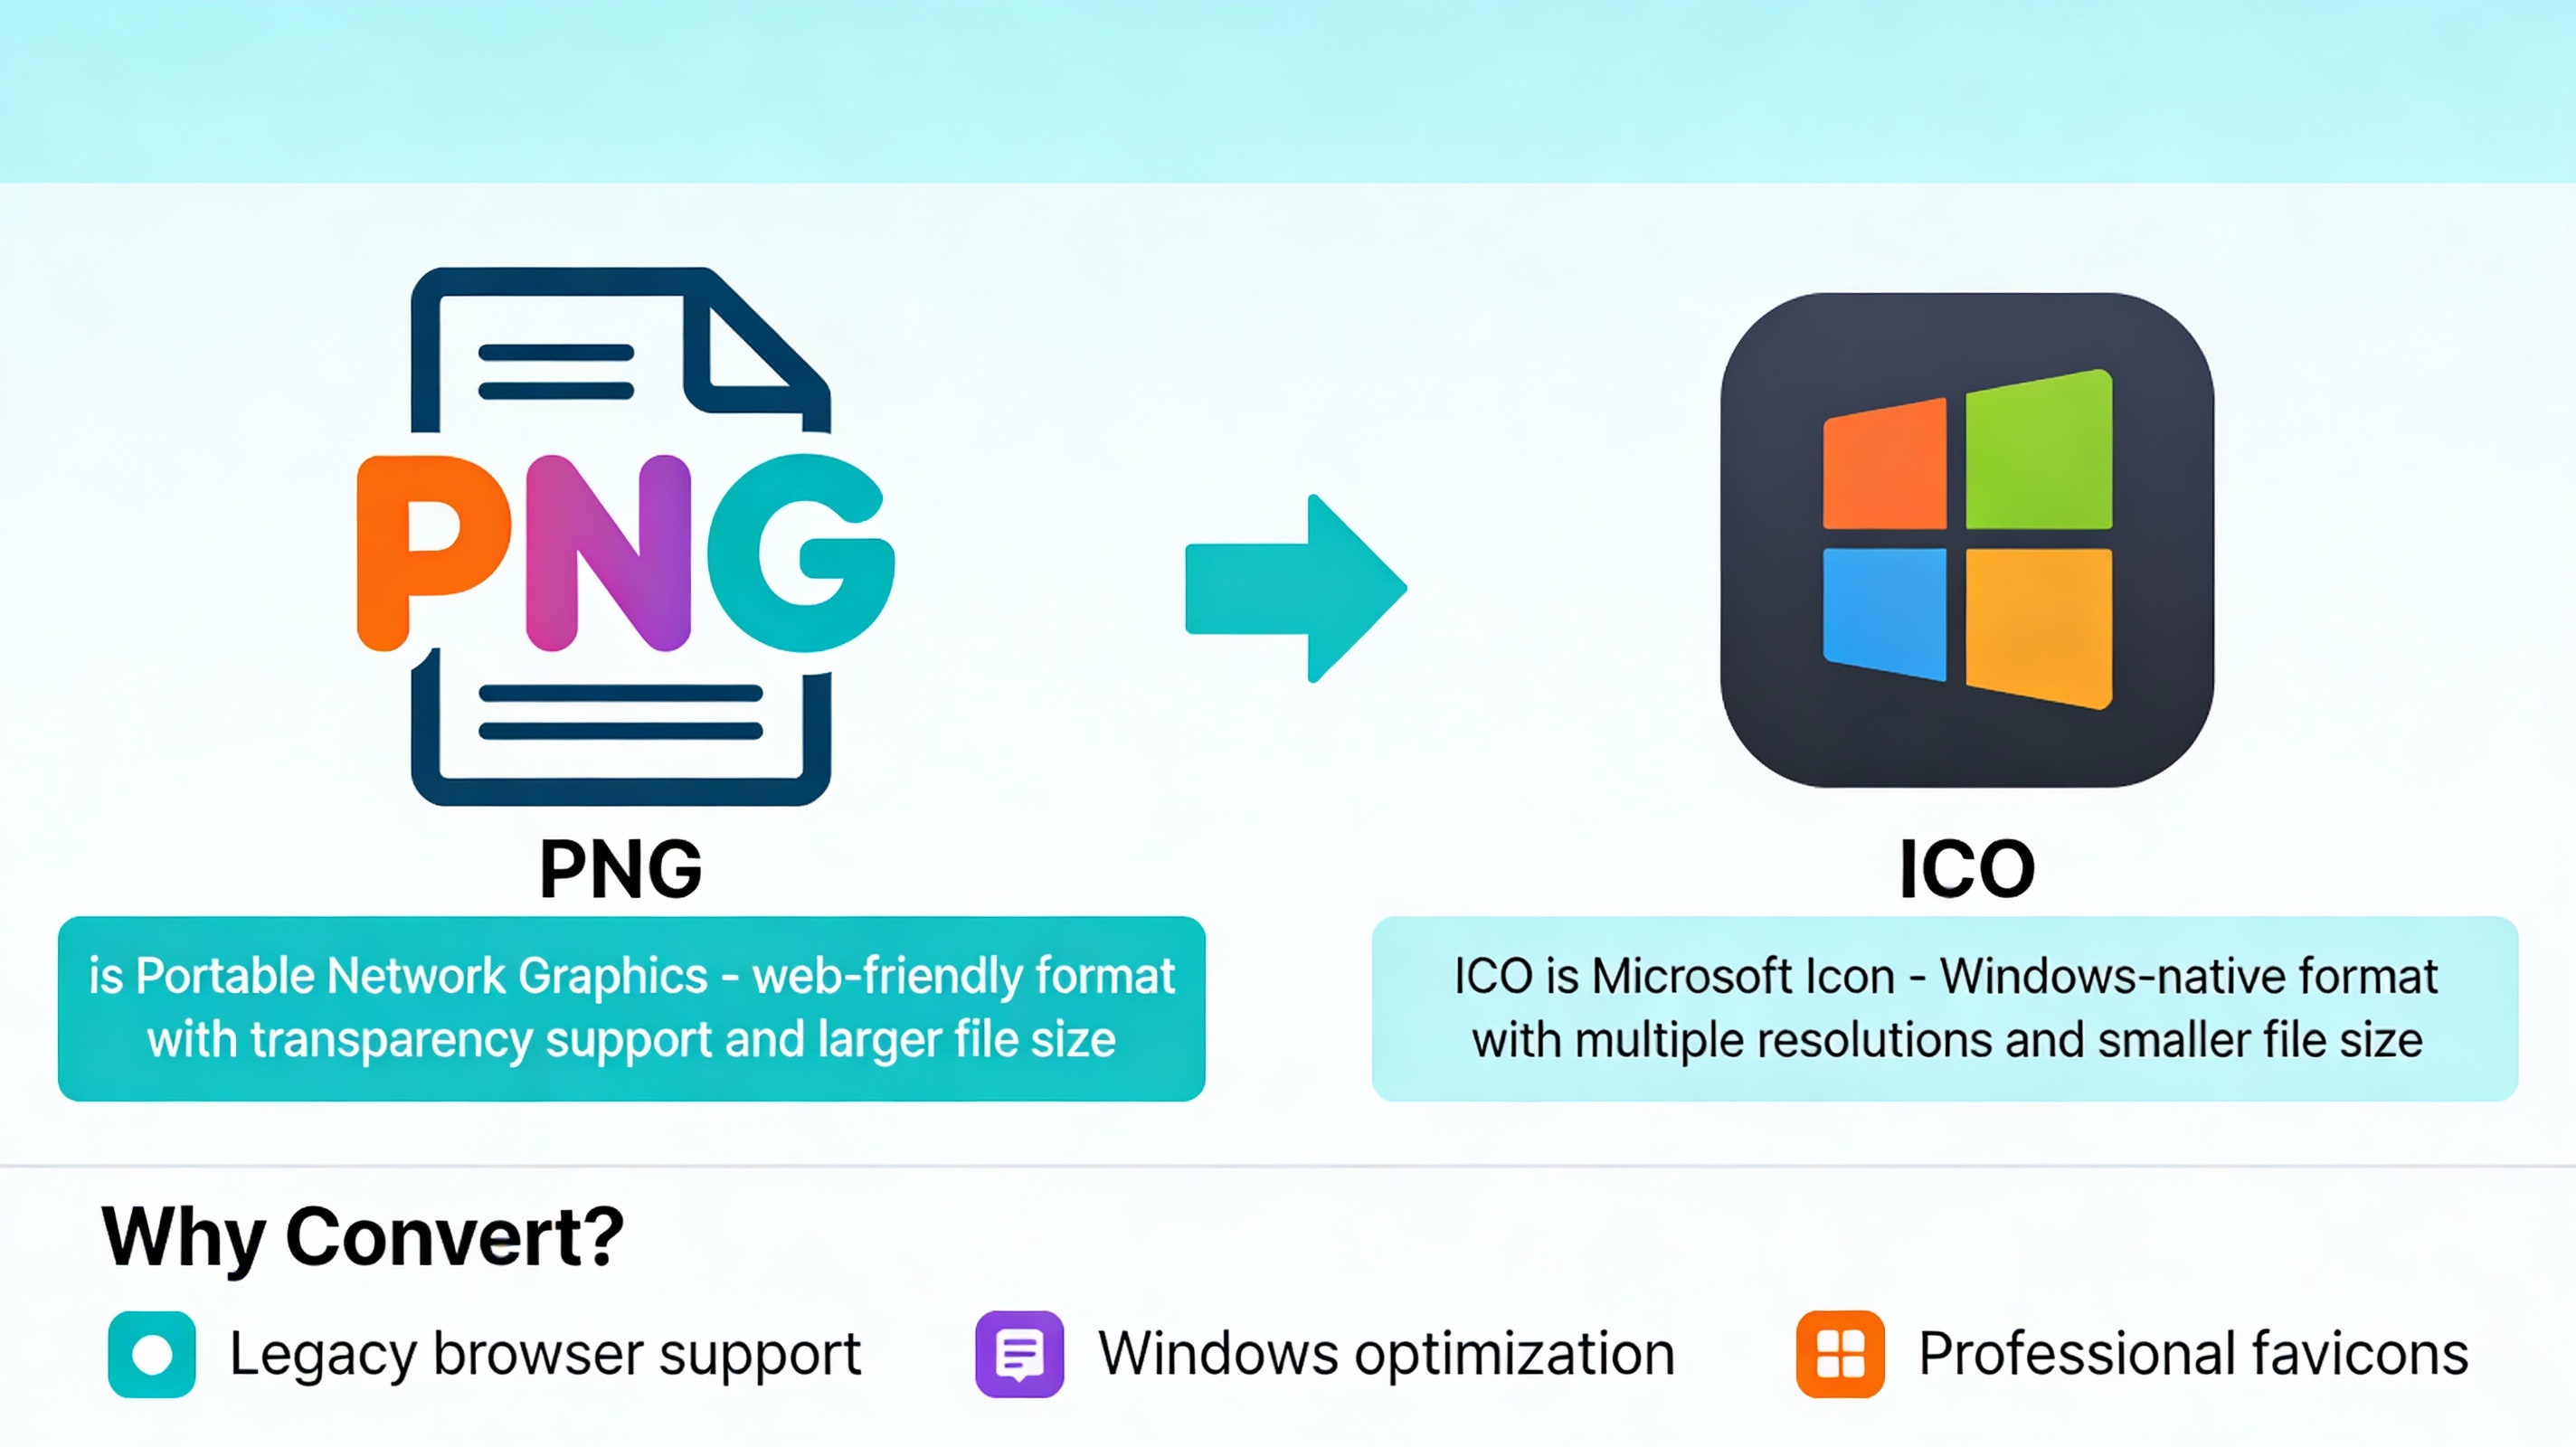
What is PNG and What is ICO?
PNG (Portable Network Graphics) is a raster image file format that was developed in 1995 as a free replacement for the Graphics Interchange Format (GIF). PNG files are widely used across the web because they support lossless compression, which means your images maintain their quality even after compression. Additionally, PNG format files support transparency through alpha channels, making them perfect for logos, icons, and graphics with irregular shapes that need to blend seamlessly with different backgrounds.
On the other hand, ICO (Microsoft Icon) is a specialized image file format developed by Microsoft specifically for storing small computer icons. The ICO file format is unique because it can contain multiple images of different sizes and color depths within a single file. This capability makes ICO files incredibly versatile for different display scenarios. A single ICO file might contain 16×16, 32×32, and 48×48 pixel versions of the same icon, allowing the system to automatically select the appropriate resolution based on where the icon will be displayed.
When converting PNG to ICO, you’re essentially transforming a standard web-friendly image format into a specialized icon format that Windows systems and browsers recognize and process efficiently.
Why Convert PNG to ICO?
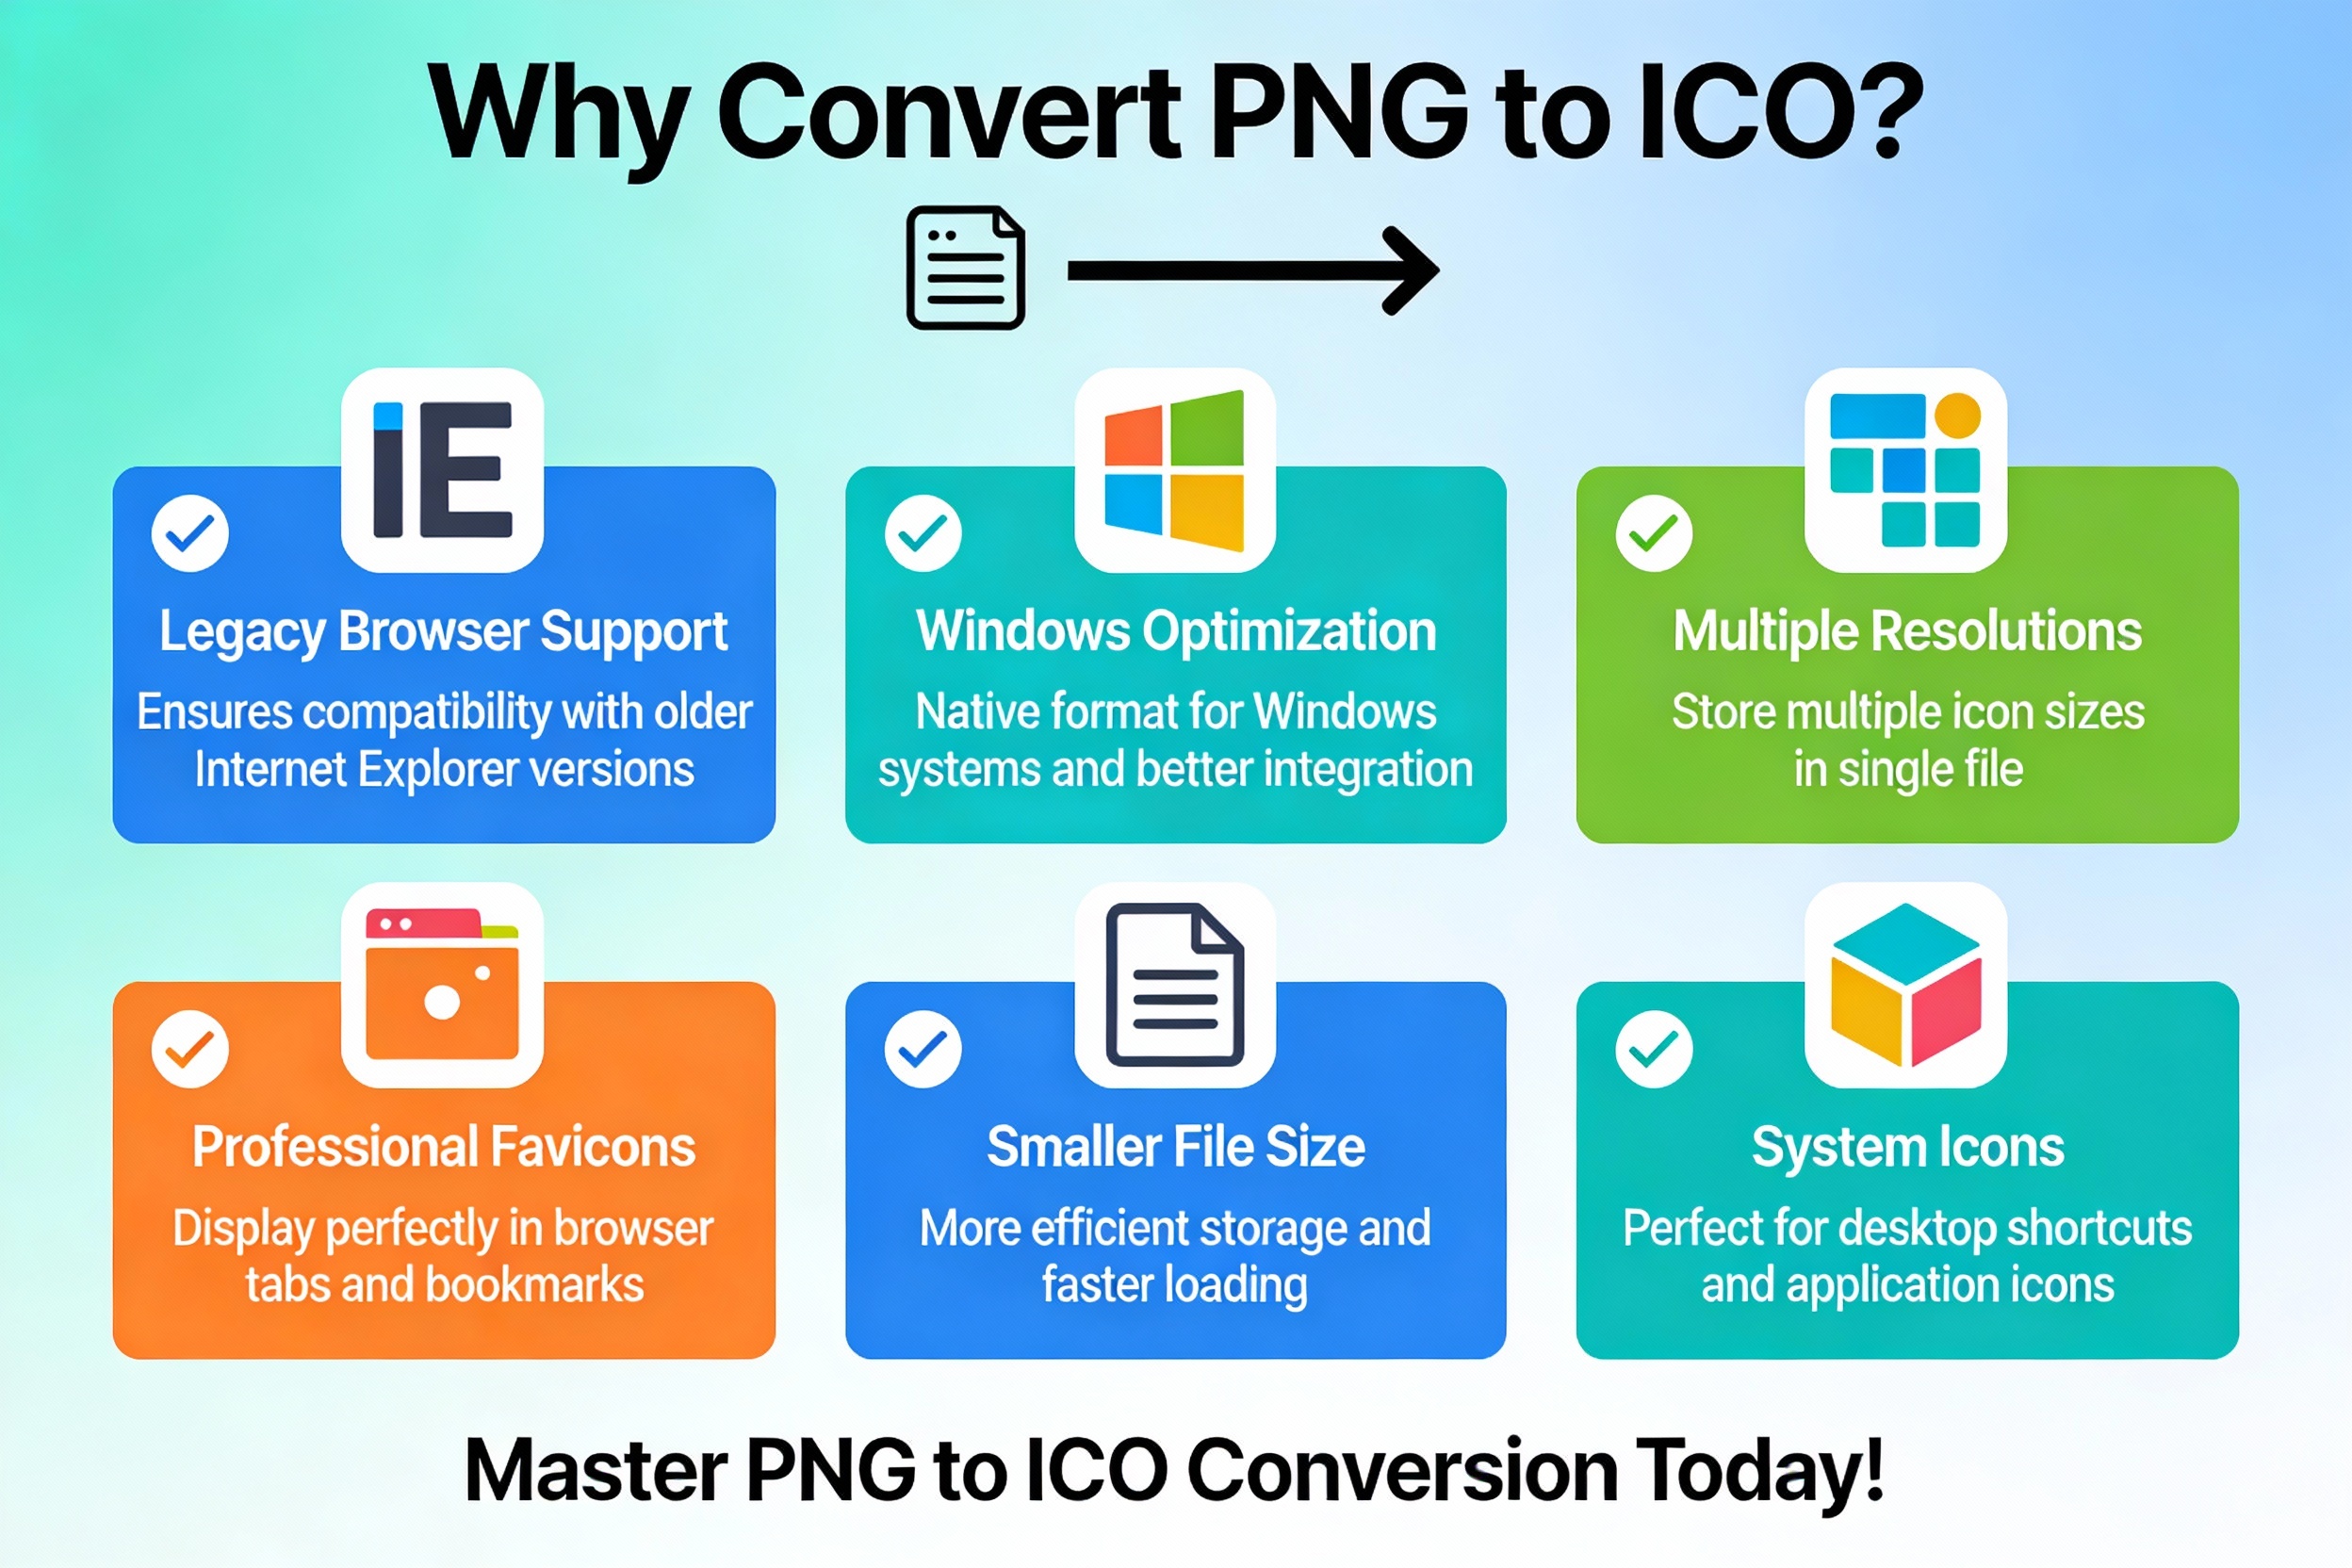

There are several compelling reasons why you might want to convert PNG to ICO format. First, many legacy systems and older browsers require ICO format for proper favicon support. Internet Explorer versions before IE11 exclusively supported ICO format favicons, and while modern browsers are more flexible, keeping an ICO version ensures maximum compatibility across all platforms.
Second, the ICO format offers technical advantages for Windows-based systems. When you convert PNG to ICO, you create a file that Windows can more efficiently handle for system icons, desktop icons, and application shortcuts. The format’s ability to store multiple resolutions within one file reduces file management complexity and ensures pixel-perfect rendering at various display sizes.
Third, converting PNG to ICO allows you to create professional-looking website favicons that display consistently across all browsers. A quality conversion ensures that your website’s favicon appears crisp and clear in browser tabs, bookmarks, and search results, reinforcing your brand identity.
How to Convert PNG to ICO: Step-by-Step Guide
Method 1: Using Online Converters
The easiest way to learn how to convert PNG to ICO is through free online converters. Here’s how to do it:
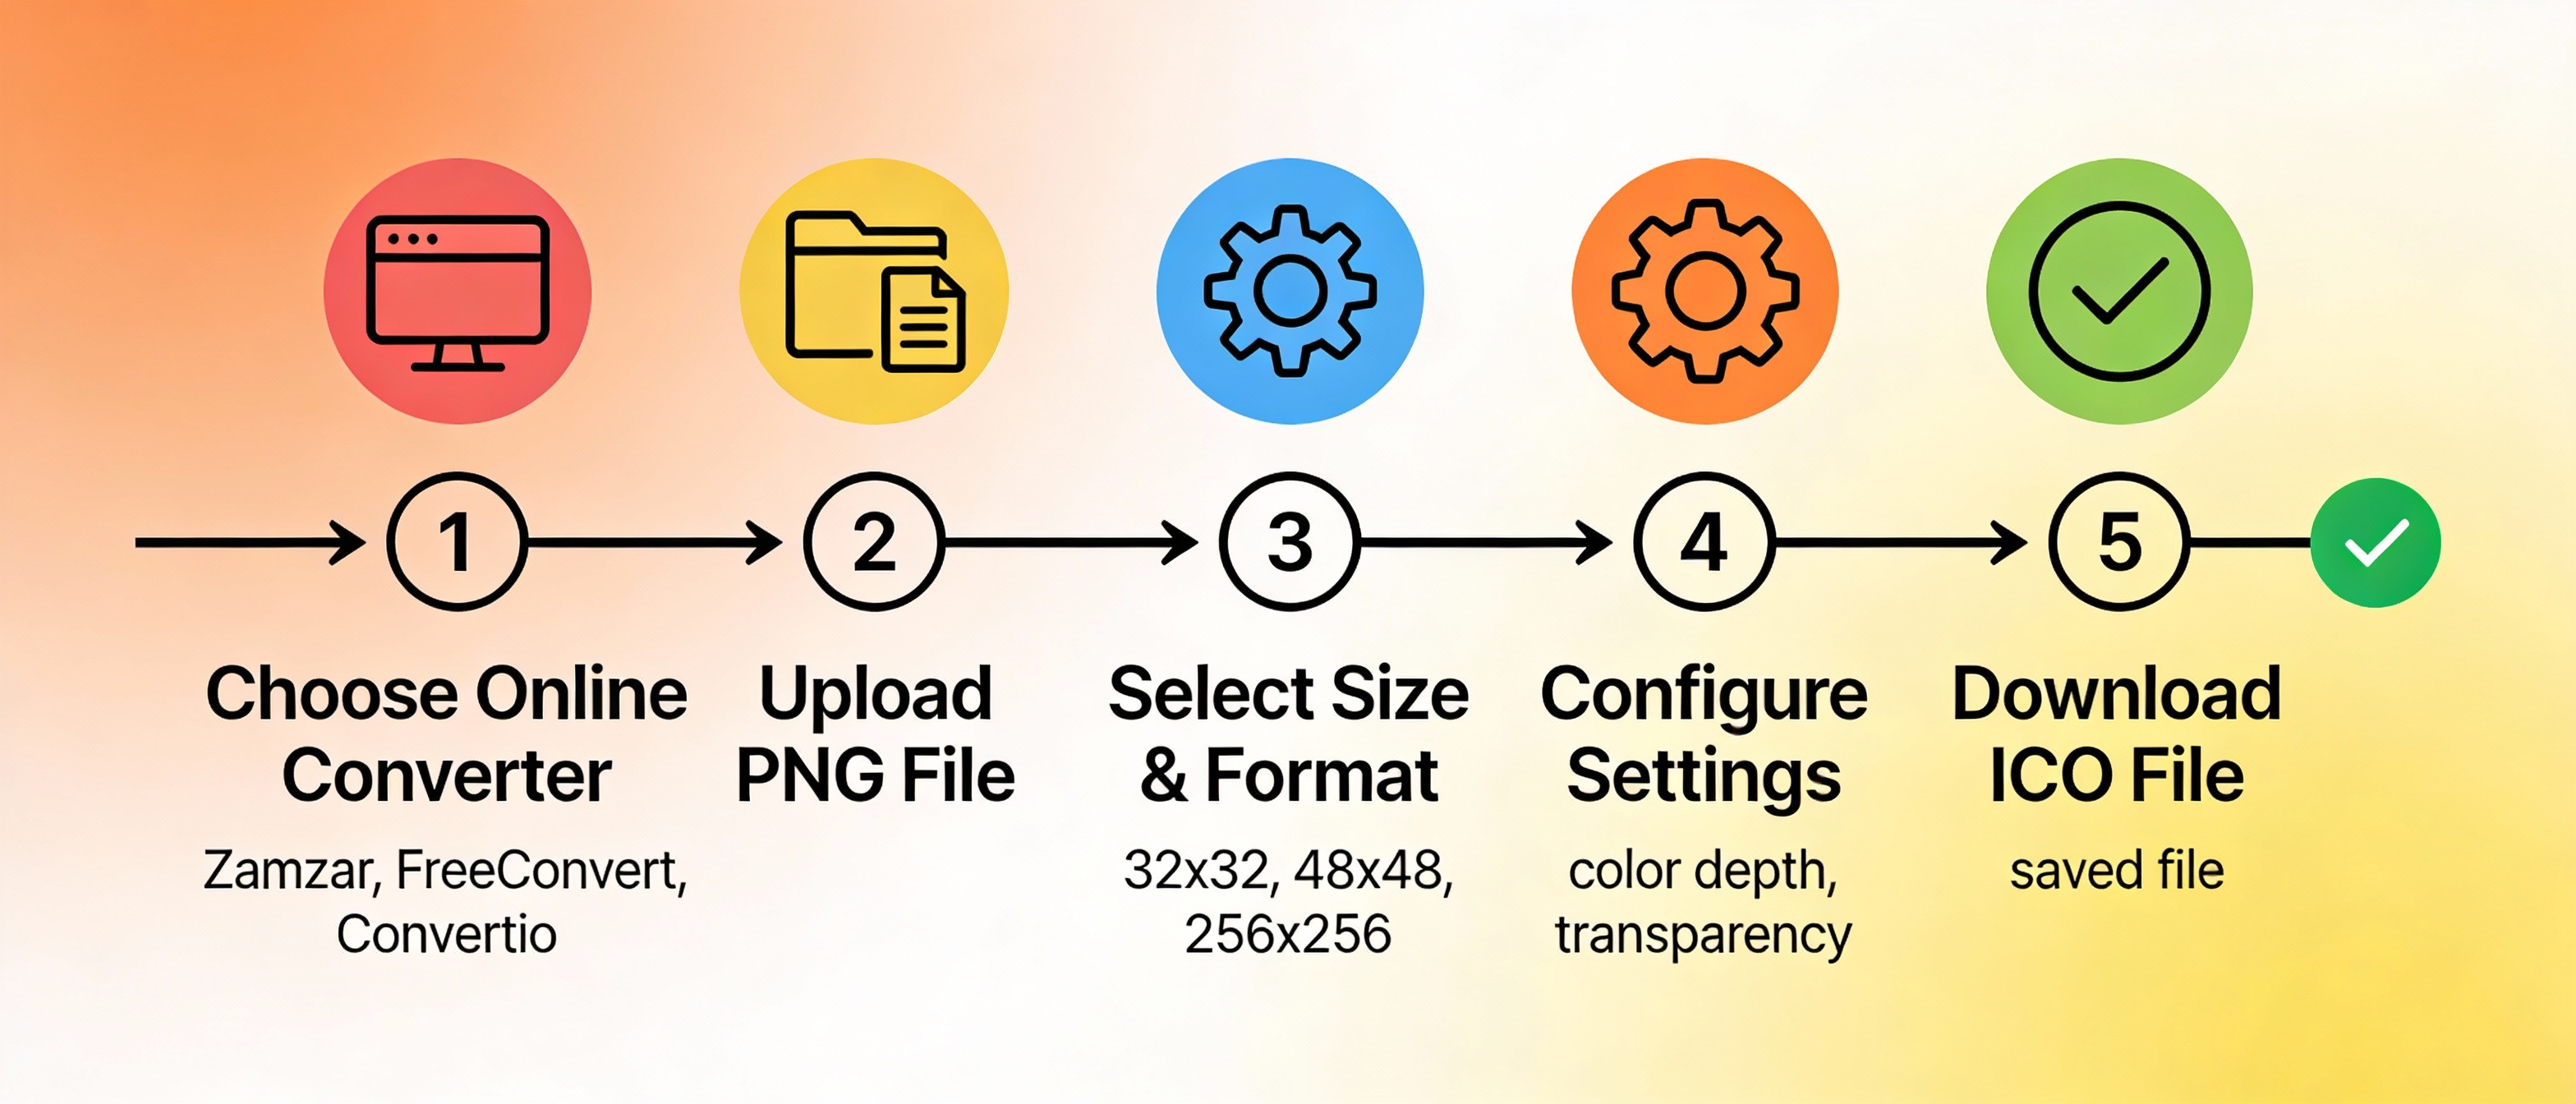
- Step 1: Choose a Reliable Converter
Start by selecting a reliable online converter for PNG to ICO conversion. Popular options include Zamzar, FreeConvert, Convertio, and ConvertICO. These platforms offer free conversion services that require no registration or software installation. - Step 2: Upload Your PNG File
Visit your chosen converter website and upload your PNG image file. Most converters allow you to either click an upload button or drag and drop your file directly into the conversion area. Make sure your PNG file is square-shaped (equal width and height) for best results. - Step 3: Select ICO Format and Size Options
Before starting the PNG to ICO conversion process, you may need to specify your desired output size. Common favicon sizes include 16×16, 32×32, and 48×48 pixels. For Windows desktop icons, you might choose 32×32, 64×64, 128×128, or 256×256 pixels. - Step 4: Configure Advanced Settings
Most quality converters offer advanced options. You might choose settings for color depth (8-bit, 24-bit, or 32-bit), quality levels, and whether to preserve transparency. Leave these at default settings if you’re unsure. - Step 5: Convert and Download
Click the convert button and wait for the process to complete. This usually takes just a few seconds. Once finished, download your new ICO file and save it to your computer.
Method 2: Using Desktop Software
If you prefer working offline, several desktop applications can help you convert PNG to ICO:
- Using Microsoft Paint:
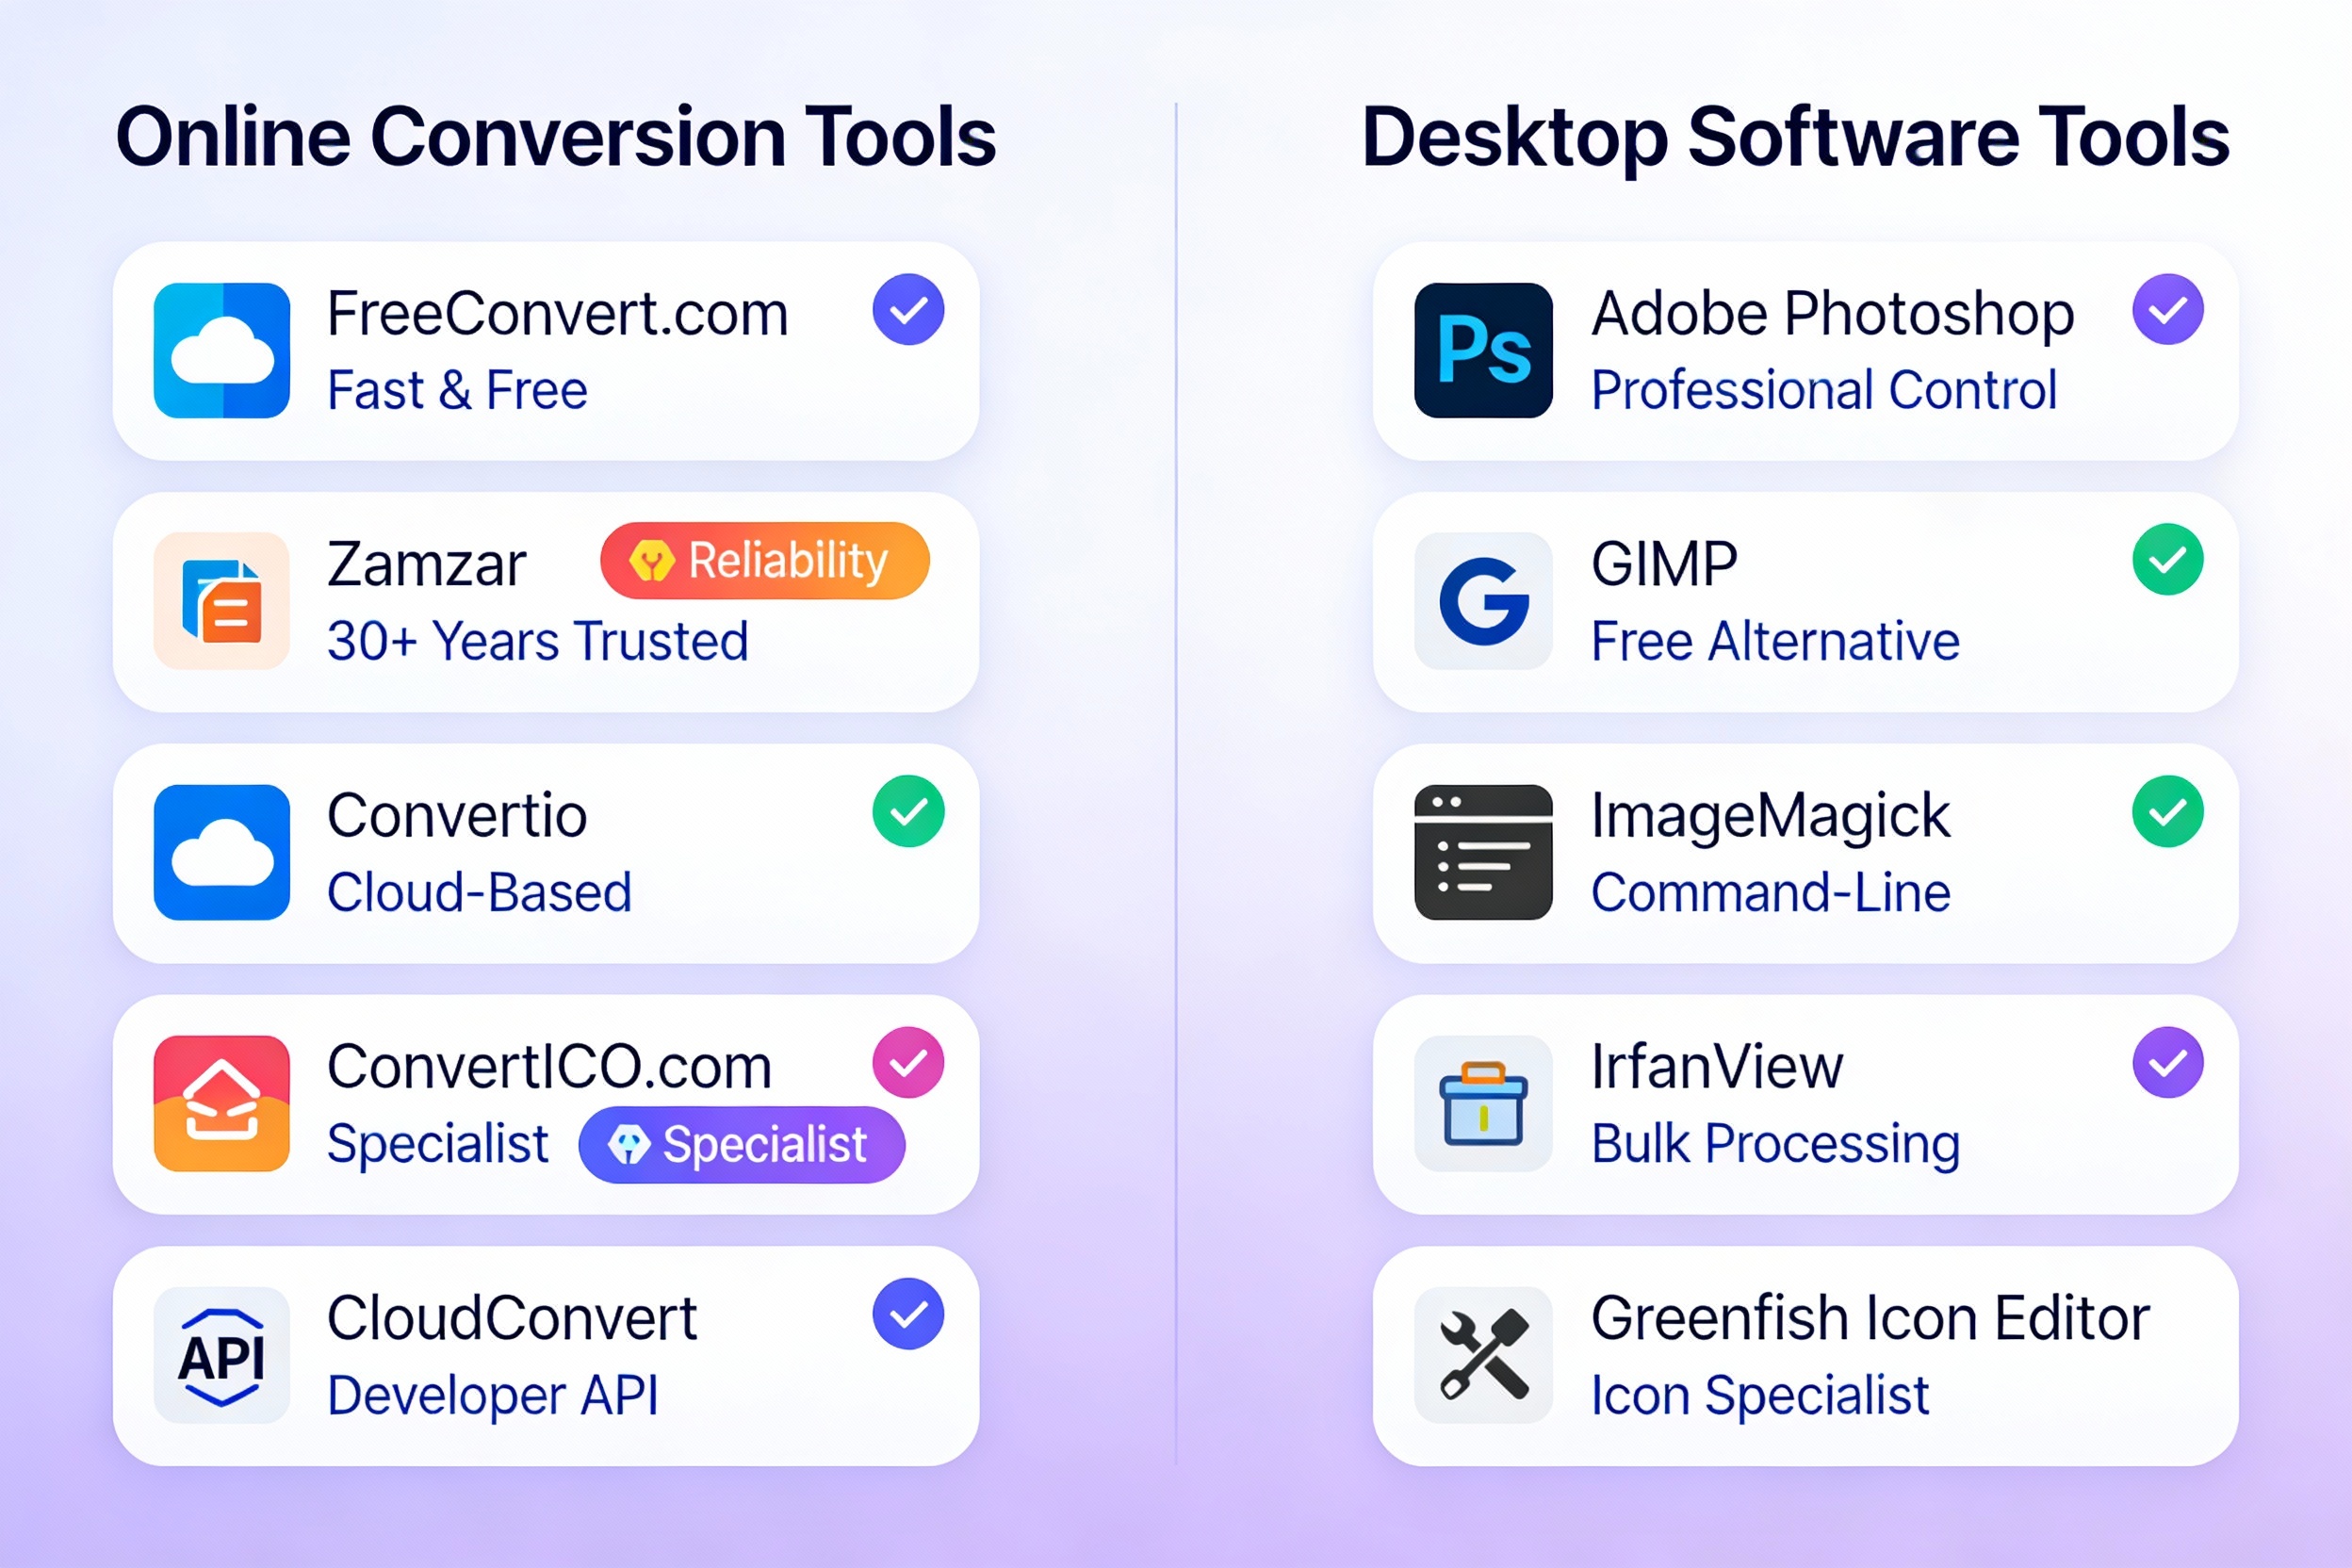
While Paint is basic, it can handle file conversion. Open your PNG in Paint, resize it to your desired dimensions if needed, and use the “Save As” option. Change the file extension from .png to .ico. However, this method has limitations regarding transparency preservation. - Using Adobe Photoshop:
Photoshop users can create high-quality ICO files from PNG images. Open your PNG file, resize it to the appropriate dimensions, and use File > Export to save as an ICO file. This method gives you maximum control over the conversion process. - Using GIMP:
GIMP is a free alternative that handles conversion effectively. Open your PNG, go to File > Export As, and select ICO as the file format. GIMP maintains transparency well during the process. - Using IrfanView:
This lightweight image viewer includes batch conversion capabilities. IrfanView can process multiple files simultaneously, making it ideal if you need to convert PNG to ICO in bulk.
Method 3: Batch Conversion
If you’re working with multiple PNG files, batch conversion saves time and effort. Many online converters and desktop applications support processing multiple files simultaneously. To perform batch conversion:
- Select all your PNG files
- Upload them simultaneously to a batch-capable converter
- Choose your conversion settings once
- Let the tool process all files at once
- Download all converted ICO files as a ZIP archive
Best Tools for Image Format Conversion
Top Online Converters
Several excellent online platforms excel at converting images to ICO format.
- FreeConvert.com stands out for its speed and quality, offering both individual and batch conversion without watermarks or file limits. The interface is intuitive, making it perfect for beginners attempting PNG to ICO conversion for the first time.
- Zamzar brings reliability with decades of experience in file conversion. Their conversion service is secure, fast, and offers advanced options for those who need more control during the process.
- Convertio provides a cloud-based solution that works from any device with an internet connection. Their advanced conversion algorithms ensure high-quality results.
- ConvertICO.com specializes specifically in ICO conversion. Their expertise in this niche shows in the quality of results and the number of customization options available, including batch processing capabilities.
- CloudConvert offers professional-grade conversion services. Their converter maintains excellent quality and offers API access for developers who need to automate conversions in their applications.
Recommended Desktop Tools
- Greenfish Icon Editor is a dedicated tool for creating and converting icons. It excels at handling conversion while providing advanced editing capabilities if you want to refine your images before finalizing them.
- ImageMagick serves developers who prefer command-line conversion. While it has a steeper learning curve, ImageMagick offers unparalleled flexibility and power for automated workflows.
- XnConvert supports batch processing and can handle bulk conversion alongside hundreds of other format conversions.
Quality Preservation When Converting Images
Avoiding Quality Loss During Conversion
One of the primary concerns when converting PNG files is maintaining image quality.
Here are essential tips for preserving quality throughout the process:
- Start with High-Resolution Source Images:
Before conversion, ensure your original PNG file is high-resolution. If your source PNG is too small, upscaling during the process will result in pixelated, blurry icons. For favicon conversion, start with at least 256×256 pixels. For desktop icons, use 512×512 or larger. - Choose Appropriate Dimensions:
Select sizes that match your intended use. For favicons, 32×32 or 48×48 pixels are standard. For Windows desktop icons, consider 64×64, 128×128, or 256×256 pixels. Avoid excessive enlargement by choosing realistic target sizes. - Preserve Transparency:
Most modern converters preserve transparency by default. Ensure this option is enabled in your settings. Transparency is crucial for icons that need to display cleanly over various backgrounds. - Use 32-Bit Color Depth:
Opt for 32-bit color depth if available. This provides the best color fidelity and ensures your converted file maintains the visual quality of your original image. - Test After Conversion:
After converting your files, test the result in its intended context. View your favicon in multiple browsers, or check your desktop icon at various zoom levels. This verification step confirms that quality was maintained throughout the process.
Troubleshooting Common Conversion Issues
Why Your Converted Icon Might Not Display
Even with a successful conversion, icons sometimes don’t display correctly. Here are common causes and solutions:
- Browser Caching Issues:
After uploading your converted file to your website, browsers might display an old version from their cache. Clear your browser cache completely, then do a hard refresh (Ctrl+Shift+R on Windows or Cmd+Shift+R on Mac) to force browsers to reload your newly converted file. - Incorrect File Placement:
When converting for a favicon, place the favicon.ico file in your website’s root directory. Browsers automatically check this location. If your converted file is stored elsewhere, update the link in your HTML head tag accordingly. - Missing HTML Link Tags:
Ensure your HTML includes the proper link to your converted file. Add this line in your document’s head:<link rel="icon" type="image/x-icon" href="/favicon.ico">. Without this, browsers won’t know where to find your file. - Incorrect File Format:
Verify that your conversion actually created an ICO file, not just a renamed PNG. Check the file properties; it should display as type “Icon” rather than “PNG Image.”
Advanced Conversion Considerations
Understanding Color Depth in the Conversion Process
When converting images, you’re making decisions about color depth. Most modern converters offer these options:
- 8-Bit Color Depth:
This creates smaller file sizes but limits your icon to 256 colors. This depth works well for simple, bold icon designs but may not suit complex graphics. - 24-Bit Color Depth:
With 24-bit depth, you get 16 million colors but no transparency support. This is less common for icon use. - 32-Bit Color Depth:
This is the best choice for most conversions. It supports 16 million colors plus an alpha channel for transparency, providing maximum flexibility and visual quality.
File Size Optimization During Conversion
While converted ICO files are naturally smaller than many formats, optimizing during the process improves performance:
- Use conversion tools that compress automatically
- Choose appropriate dimensions to avoid unnecessary file size
- For favicons, 16×16 or 32×32 pixels usually suffice, keeping the final file tiny
- Consider multiple resolutions within one ICO file to serve all device types efficiently
Comparing ICO with Alternative Formats

When considering file conversion options, it’s worth understanding how ICO compares to other formats:
- PNG vs ICO:
PNG files are generally larger than their ICO equivalents but offer broader compatibility across modern platforms. ICO provides better system integration on Windows. Many modern websites use PNG directly for favicons while maintaining an ICO version for backward compatibility. - SVG vs ICO:
When converting to ICO, you’re choosing a raster format. SVG files offer scalability without quality loss but don’t provide the multiple-resolution-in-one-file capability that ICO offers. Some prefer SVG for modern websites since it scales perfectly to any size. - WebP vs ICO:
Converting to ICO creates a smaller, more compatible file than PNG. However, WebP offers even better compression. Consider your target audience’s browser support before choosing your conversion format.
Professional Conversion for Developers
Automating the Conversion Process
Developers frequently need to automate conversion workflows. Several approaches exist:
- Using APIs:
Services like CloudConvert and Convertio offer APIs for programmatic conversion. This allows you to build conversion directly into your applications. - Command-Line Tools:
ImageMagick and GraphicsMagick provide command-line interfaces for batch processing. For example, ImageMagick can handle conversion with:convert image.png icon.ico - Building Custom Solutions:
Some developers build custom conversion functionality using libraries in Python, Node.js, or other programming languages. This provides maximum control over the process.
Best Practices for Successful Conversion
Achieving Perfect Results
Following these best practices ensures successful image conversion:
- Validate Your Source File: Before attempting conversion, verify that your PNG file is square and suitable for icon use. Test the visibility of details at small sizes.
- Plan Your Conversion Sizes: Decide what sizes you need before starting. Common sizes include 16×16, 32×32, 48×48, 64×64, and 256×256 pixels.
- Test Across Platforms: After conversion, test your icon across Windows, macOS, and in multiple web browsers to ensure universal compatibility.
- Maintain Original Files: Keep your original high-resolution PNG files even after successful conversion, allowing for future modifications without quality loss.
- Consider Batch Processing: If you regularly need to convert files, use batch conversion tools to save time and ensure consistency across multiple conversions.
- Document Your Settings: Keep notes about which settings you used during conversion. This helps maintain consistency if you need to reconvert files later.
- Leverage Advanced Options Wisely: While basic conversion is straightforward, understanding advanced options like color depth and transparency handling helps you optimize results for your specific use case.
Conclusion: Mastering Image Format Conversion
Converting PNG to ICO is an essential skill in modern web development and Windows customization. Mastering the PNG to ICO conversion process empowers you to create professional-looking icons that work seamlessly across all platforms and browsers. Whether you’re creating website favicons, customizing your desktop, or developing Windows applications, understanding PNG to ICO conversion gives you the tools needed to succeed. The ability to handle PNG to ICO conversion quickly and efficiently matters tremendously in today’s digital landscape. With the abundance of free online tools and detailed guides available, this type of conversion has never been more accessible.
Start by choosing one of the recommended converters, upload your PNG file, and download your converted ICO in minutes. Remember that successful conversion preserves image quality by starting with adequate resolution and selecting appropriate dimensions. Test your results across different contexts to ensure the converted file displays perfectly everywhere it appears.
Whether you’re a beginner doing your first conversion or an experienced developer automating bulk processes, the tools and knowledge covered in this guide will help you achieve professional results every time you work with image file format conversions.
What exactly is PNG to ICO conversion and why should I care about it?
PNG to ICO conversion is the process of transforming a Portable Network Graphics (PNG) file into a Microsoft Icon (ICO) file format. This PNG to ICO conversion process is essential for web developers and designers who need to create favicons for websites or system icons for Windows applications. The main reason you should care about PNG to ICO conversion is that many older browsers and Windows systems require the ICO format for proper icon display, whereas PNG files, while excellent for web use, don’t integrate as seamlessly with Windows systems. Understanding PNG to ICO conversion helps ensure your icons display perfectly across all platforms and browsers, maintaining professional branding and user experience.
Which tools are best for PNG to ICO conversion, and can I do it without installing software?
Yes, absolutely! There are numerous free online PNG to ICO conversion tools available that require no software installation whatsoever. Popular options for PNG to ICO conversion include FreeConvert.com, Zamzar, Convertio, and ConvertICO.com. These platforms allow you to perform PNG to ICO conversion directly from your web browser by simply uploading your file. If you prefer desktop solutions for PNG to ICO conversion, you can use software like Adobe Photoshop, GIMP, or IrfanView. The beauty of PNG to ICO conversion is that you have flexibility—whether you choose online converters or desktop software, the PNG to ICO conversion process delivers professional results. For batch operations, many tools support converting multiple PNG files to ICO format simultaneously, saving you considerable time.
How do I maintain quality when performing PNG to ICO conversion?
Maintaining quality during PNG to ICO conversion requires careful attention to several factors. First, always start with a high-resolution PNG file—ideally at least 256×256 pixels—before attempting PNG to ICO conversion. During the PNG to ICO conversion process, select the appropriate output size that matches your intended use (32×32 for favicons, larger sizes for desktop icons). Always enable transparency preservation in your PNG to ICO conversion settings to maintain the alpha channel. Use 32-bit color depth during your PNG to ICO conversion for the best color fidelity and visual quality. Finally, after completing your PNG to ICO conversion, test the resulting icon in multiple browsers and on your Windows desktop to verify that quality has been preserved. These steps ensure your PNG to ICO conversion produces professional, crisp icons every time.
What should I do if my converted icon isn’t displaying properly after PNG to ICO conversion?
If your icon isn’t displaying after PNG to ICO conversion, several troubleshooting steps can help. First, clear your browser cache and perform a hard refresh to ensure you’re viewing the latest version of your converted file. For website favicons, verify that your PNG to ICO conversion result is placed in your website’s root directory and that your HTML includes the proper link tag pointing to the favicon.ico file. Check that your PNG to ICO conversion actually created a proper ICO file—not just a renamed PNG—by checking the file properties. If the icon looks pixelated after PNG to ICO conversion, your source PNG may have been too small; redo the PNG to ICO conversion with a higher-resolution source image. For Windows desktop icons, ensure the PNG to ICO conversion was completed correctly and that the ICO file is properly linked in your shortcut properties. These solutions typically resolve any display issues resulting from PNG to ICO conversion problems.
PNG to ICO conversion is the process of transforming a Portable Network Graphics (PNG) file into a Microsoft Icon (ICO) file format. This PNG to ICO conversion process is essential for web developers and designers who need to create favicons for websites or system icons for Windows applications. The main reason you should care about PNG to ICO conversion is that many older browsers and Windows systems require the ICO format for proper icon display, whereas PNG files, while excellent for web use, don’t integrate as seamlessly with Windows systems. Understanding PNG to ICO conversion helps ensure your icons display perfectly across all platforms and browsers, maintaining professional branding and user experience.
Yes, absolutely! There are numerous free online PNG to ICO conversion tools available that require no software installation whatsoever. Popular options for PNG to ICO conversion include FreeConvert.com, Zamzar, Convertio, and ConvertICO.com. These platforms allow you to perform PNG to ICO conversion directly from your web browser by simply uploading your file. If you prefer desktop solutions for PNG to ICO conversion, you can use software like Adobe Photoshop, GIMP, or IrfanView. The beauty of PNG to ICO conversion is that you have flexibility—whether you choose online converters or desktop software, the PNG to ICO conversion process delivers professional results. For batch operations, many tools support converting multiple PNG files to ICO format simultaneously, saving you considerable time.
Maintaining quality during PNG to ICO conversion requires careful attention to several factors. First, always start with a high-resolution PNG file—ideally at least 256×256 pixels—before attempting PNG to ICO conversion. During the PNG to ICO conversion process, select the appropriate output size that matches your intended use (32×32 for favicons, larger sizes for desktop icons). Always enable transparency preservation in your PNG to ICO conversion settings to maintain the alpha channel. Use 32-bit color depth during your PNG to ICO conversion for the best color fidelity and visual quality. Finally, after completing your PNG to ICO conversion, test the resulting icon in multiple browsers and on your Windows desktop to verify that quality has been preserved. These steps ensure your PNG to ICO conversion produces professional, crisp icons every time.
If your icon isn’t displaying after PNG to ICO conversion, several troubleshooting steps can help. First, clear your browser cache and perform a hard refresh to ensure you’re viewing the latest version of your converted file. For website favicons, verify that your PNG to ICO conversion result is placed in your website’s root directory and that your HTML includes the proper link tag pointing to the favicon.ico file. Check that your PNG to ICO conversion actually created a proper ICO file—not just a renamed PNG—by checking the file properties. If the icon looks pixelated after PNG to ICO conversion, your source PNG may have been too small; redo the PNG to ICO conversion with a higher-resolution source image. For Windows desktop icons, ensure the PNG to ICO conversion was completed correctly and that the ICO file is properly linked in your shortcut properties. These solutions typically resolve any display issues resulting from PNG to ICO conversion problems.
Need to Compress or Convert Files?
Try CompressNow.in – Free, Fast & Secure file compression and conversion tools!
PDF Compressor
Image Compressor
PDF to JPG
JPG to PDF
Try CompressNow Free